
Introduction: Your Banner is an Investment, Protect It
You’ve made a great decision for your business or event: ordering a custom, heavy-duty 13oz Vinyl Banner. At Banners808.com, we take quality seriously, using advanced UV Printing technology. This specialized process ensures your graphics resist fading under the intense Hawaii sun. Furthermore, we finish every banner with reinforced hems and install metal grommets about every 24 inches (or every 12 inches as a free upgrade) along the entire perimeter—not just in the corners.
However, the highest quality banner in the world can be ruined in a single windy afternoon if it is installed improperly. This article is your comprehensive guide to correct banner installation. Our goal is to educate you on preparation and proper methods so your banner looks professional and lasts as long as possible.
The Golden Rule of Banner Installation: Don’t Just Use the Corners
⚠️ CRITICAL ERROR: The single most common mistake people make is hanging a banner (even a large one) using only the four corner grommets. This is incorrect and will almost certainly lead to failure.
When you only use the corners, wind forces are concentrated on those four tiny points. This creates immense stress, causing the material around the corner grommet to stretch, tear, and eventually fail, leaving your banner flapping in the wind. We place metal grommets all the way around for a reason: to distribute the load evenly. To install your banner correctly, you must utilize *all* the provided grommets along the top and bottom edge.
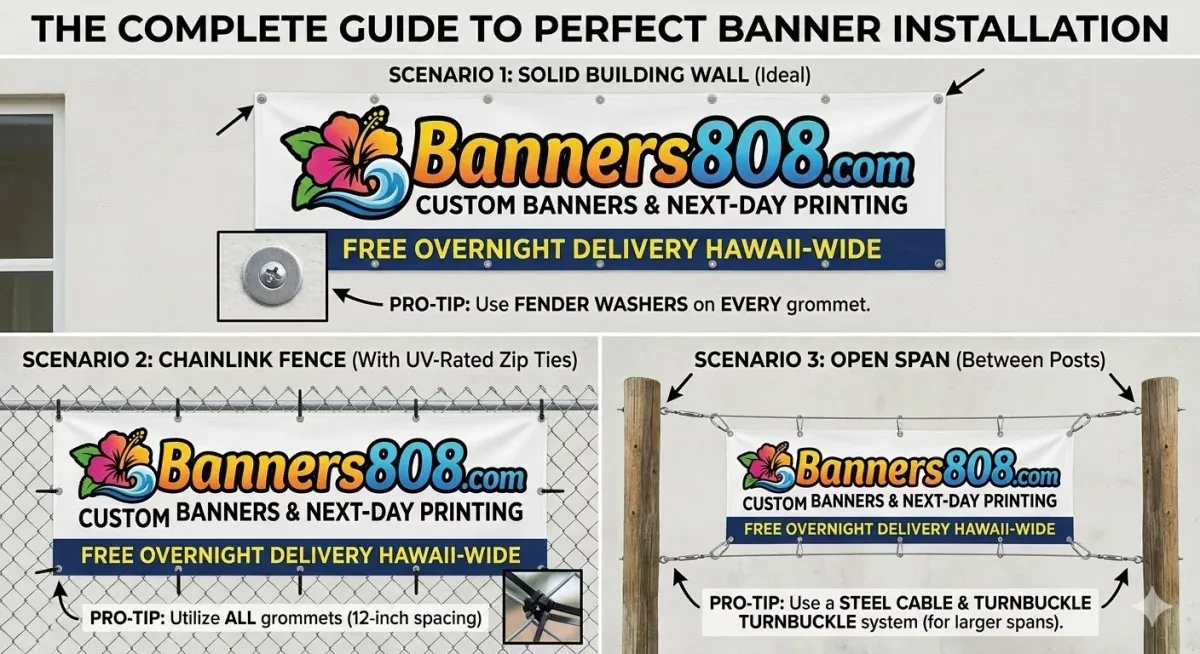
Scenario 1: Mounting Directly to a Building Wall (The Ideal Setting)
If you have the option, mounting a banner directly and flatly against a solid building wall (stucco, wood siding, or masonry) is the absolute best scenario for durability. When a banner is flat against a wall, wind cannot get behind it to create "flutter" or the "sail effect," which are the primary killers of vinyl material.
Recommended Method:
- Fasteners and Washers: Do not use string or zip ties here. You want to use mechanical fasteners. The correct method is to use a screw combined with a large, wide fender washer.
- The Process: The fender washer holds the material around the grommet tightly against the wall, preventing the grommet from being pulled through the vinyl.
- Distribute the Load: Drive a screw and washer through every single grommet along the top and bottom edges.
Scenario 2: Installation on a Fencing Structure (Wood or Chainlink)
Fencing is convenient but presents a greater wind hazard. Treat a wood fence like a building wall using screws and fender washers. For chainlink fences, heavy-duty UV-rated zip ties are the best option to keep the banner taut without the sagging associated with rope.
Scenario 3: Hanging "In the Air" Between Posts (Using Cables)
Never rely on a banner’s grommets to hold its entire weight over an open span. Install a high-tension steel aircraft cable between your posts using a turnbuckle. Secure the banner to this cable at every grommet. The cable takes the structural tension, while the banner simply displays your message.
Scenario 4: Large Open Areas (No Existing Trees or Posts)
When installing a banner in a field or open lot, you are essentially creating a giant sail. This is the most demanding environment for any signage.
The "Tri-Rigged" Post Method
In this scenario, we recommend using temporary fence posts or steel T-posts. To ensure they don't lean or collapse under wind pressure, each post must be secured with a minimum of three ropes and heavy-duty anchor hooks (tri-rigging) at precise angles to create a stable tripod effect.
Managing Wind Load: Slits vs. Mesh
- Wind Slits: For standard 13oz vinyl in open areas, we can add half-moon "wind slits." These allow air to pass through the banner, significantly reducing the pressure on your grommets.
- The Ultimate Solution: Mesh Banners. If your location is consistently windy, our Mesh Banner material is the professional choice. It features thousands of tiny perforations that allow wind to flow through naturally, eliminating the need for slits while maintaining excellent graphic visibility.
Summary of Proper Preparation
Preparation and proper methods are the difference between a banner lasting 6 months or 6 weeks. Always verify your surface, use the right hardware (fender washers!), and utilize every grommet provided by Banners808.com.
By following these professional guidelines, you ensure that your 13oz UV printed banner remains a crisp, professional representation of your brand.